#10: Designing with Intent
“Backwards planning, the importance of starting with the ‘why’, and being mindful about the types of questions we are asking- these are skills that are transferable across industries.”
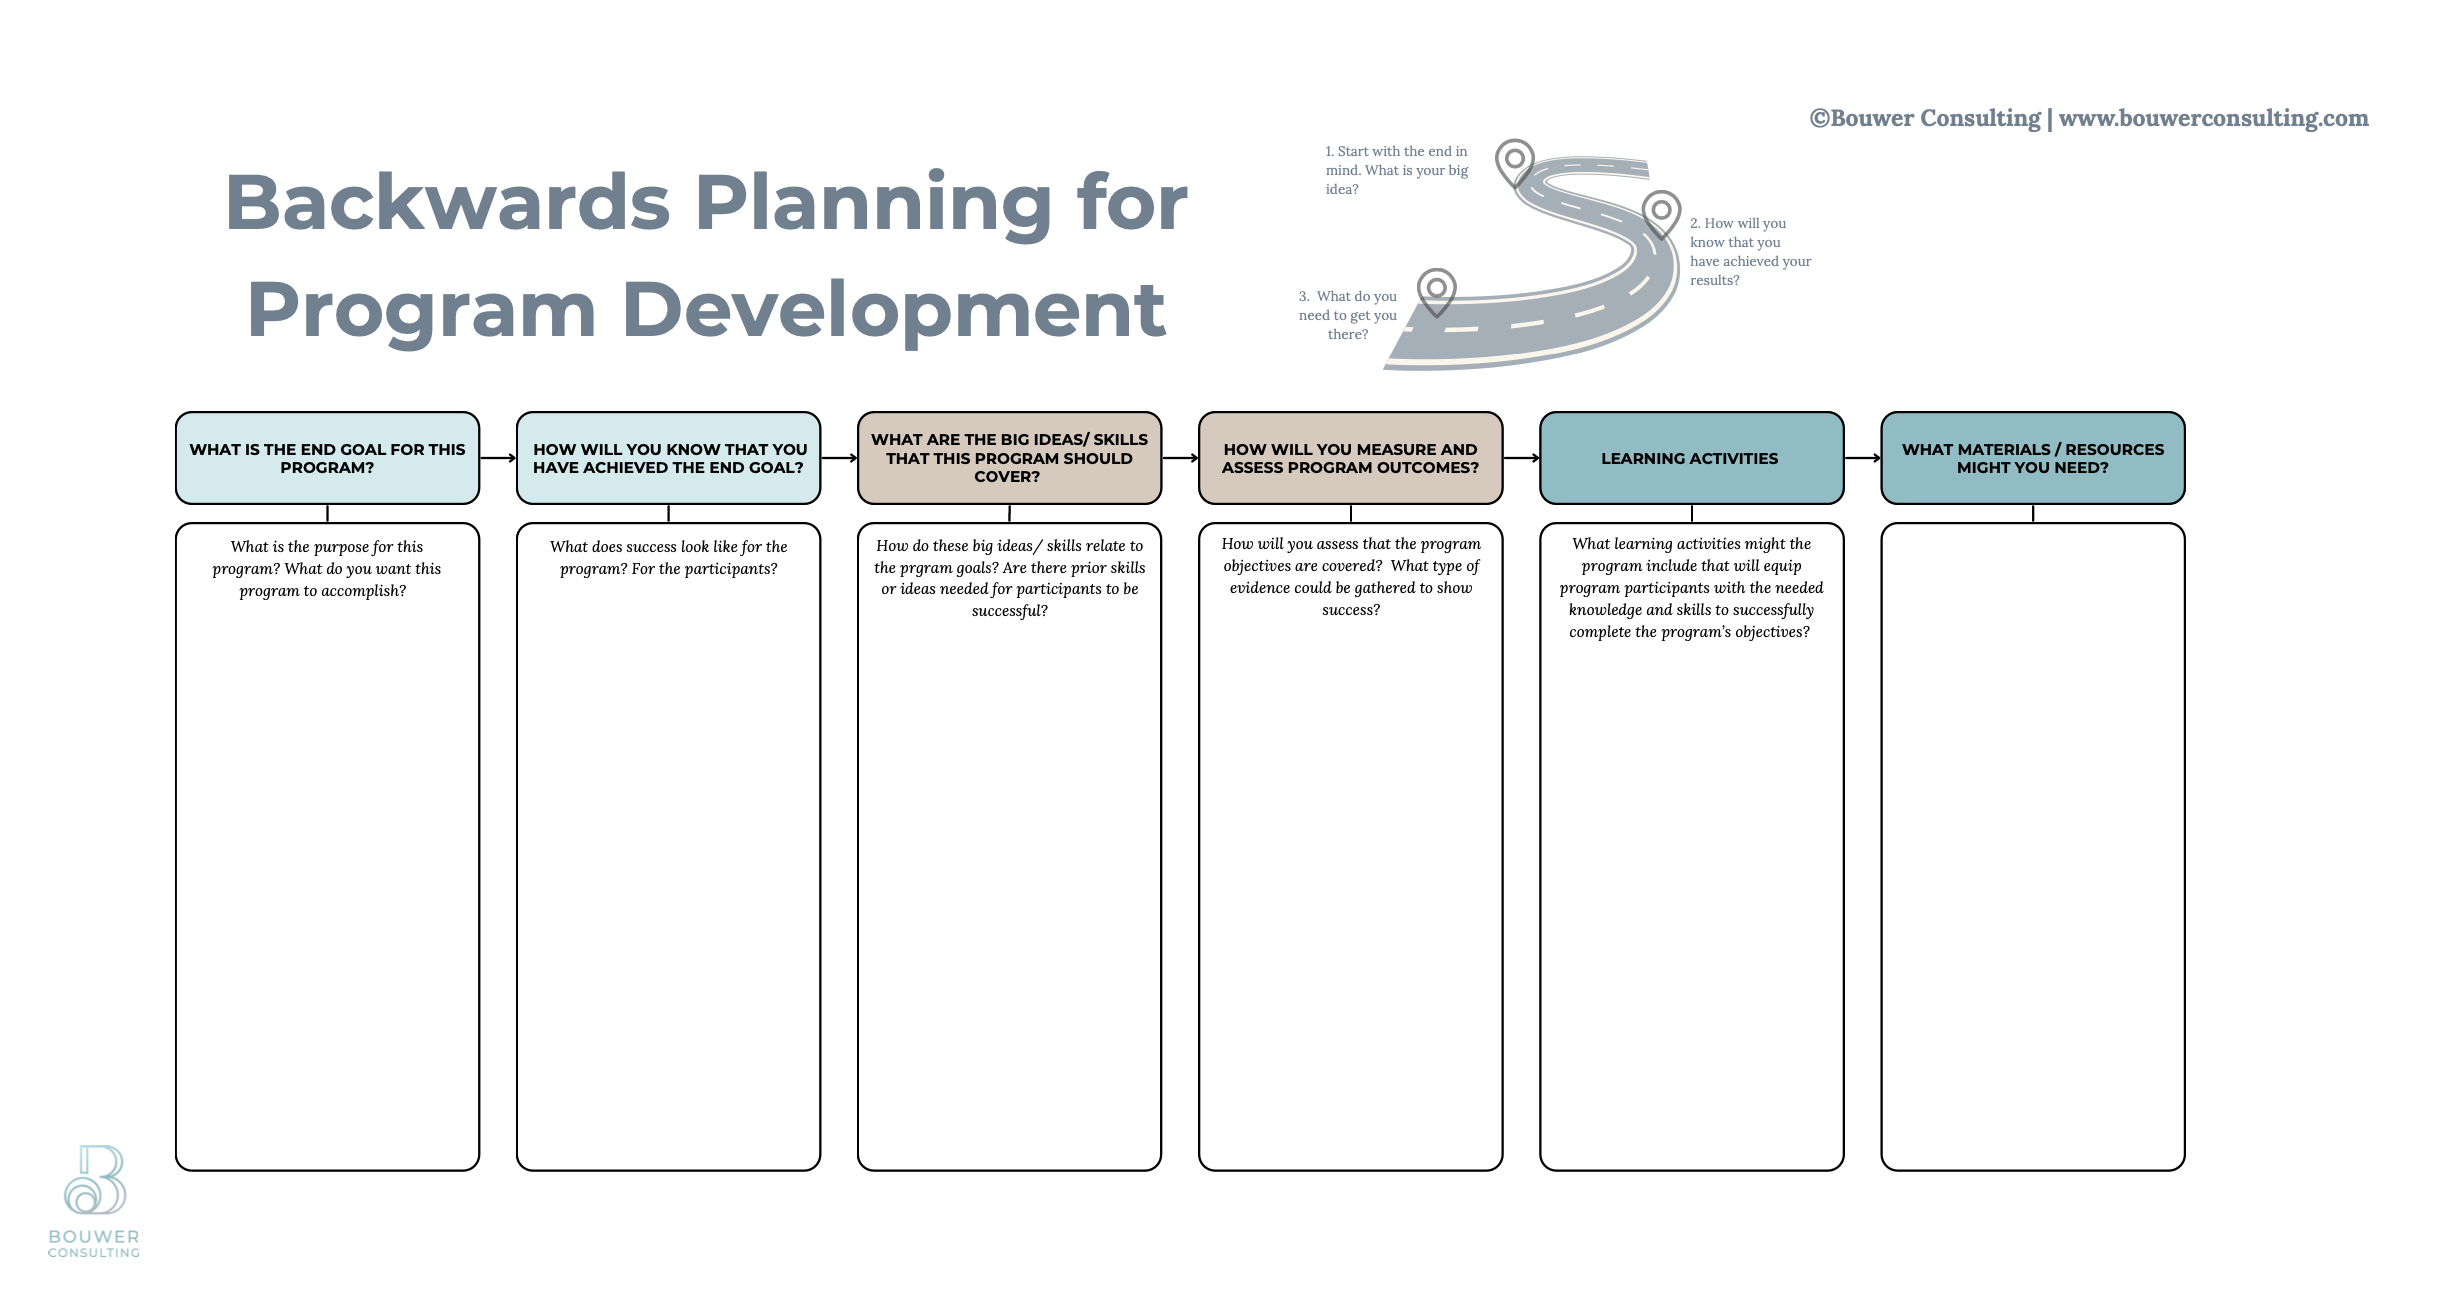
RESOURCE RECOMMENDATION:
Click HERE for our Quick Guide in Backwards Planning
On Linkedin, I’ve been posting a bit about the various aspects of Backwards Planning, the importance of starting with the “Why”, and being mindful about the type of questions we ask. As I was writing those posts, I was thinking about the importance of these connections, yet how under utilized they are. Rarely do we consider how these ideas compliment and work together.
However, these skills aren’t unique to program development, instructional design, or education. I would say they are actually ‘best practices’ that everyone should add to their ‘toolbox’.
These skills are transferable across industries.
For any concept, having tangible examples in application is helpful. Therefore, these next 4 blog posts are part of a a mini ‘PD series’ focused on showing these concepts in application. We’ll cover the following topics:
Identifying the type of questions we ask during Program Development
Show how Backwards Planning can be used in intentional Instructional Design
Provide a specific example demonstrating how Backwards Planning and Intentional Questioning impacts success
Discuss how these skills impact organizational growth and leadership
So, let’s dive in by looking at a specific example for using Backwards Planning to guide Instructional Design!
If you’re not familiar with Backwards Planning, check out my blog post “The importance of backward planning”. There you’ll also find a free PDF Backwards Planning template which could help you in own processes.
How Backwards Planning and Instructional Design Compliment One Another
Part A: Backwards Planning Step 1& 2: Identifying Goals
When I was an educator in the classroom, in addition to my core courses, I also had an elective class that I was asked to design and teach. I was given a clean slate and had freedom to create any course I thought that upper middle school students (ages 12-14) would enjoy taking. The only ‘must haves’ for the course was that it needed to include things that I valued (to ensure I would enjoy teaching it!) and that the course aligned with the broader program goals.
With that in mind, these are the 3 ‘tent pegs’ I knew I wanted this course to be grounded in:
Design Thinking Process had to be included- I’m a huge believer in this and I wanted students going through this process as often as possible
I wanted to deepen the connections that were made in my core course (which had a focus on Global Issues)
I wanted to bridge my background in international development and education for students to not only understand broader global connections (WHAT), but also move towards the application process for how they might approach solutions to some of the challenges communities face. (HOW/ WHY)
Living in Asia, flooding and its impact on community housing is a large problem. After doing some research and reading, I found a great resource from Practical Action called “Beat the Flood”. After reviewing it, I knew exactly what I wanted to do and what my overarching goal for this specific course would be.

#10:
Designing With Intent
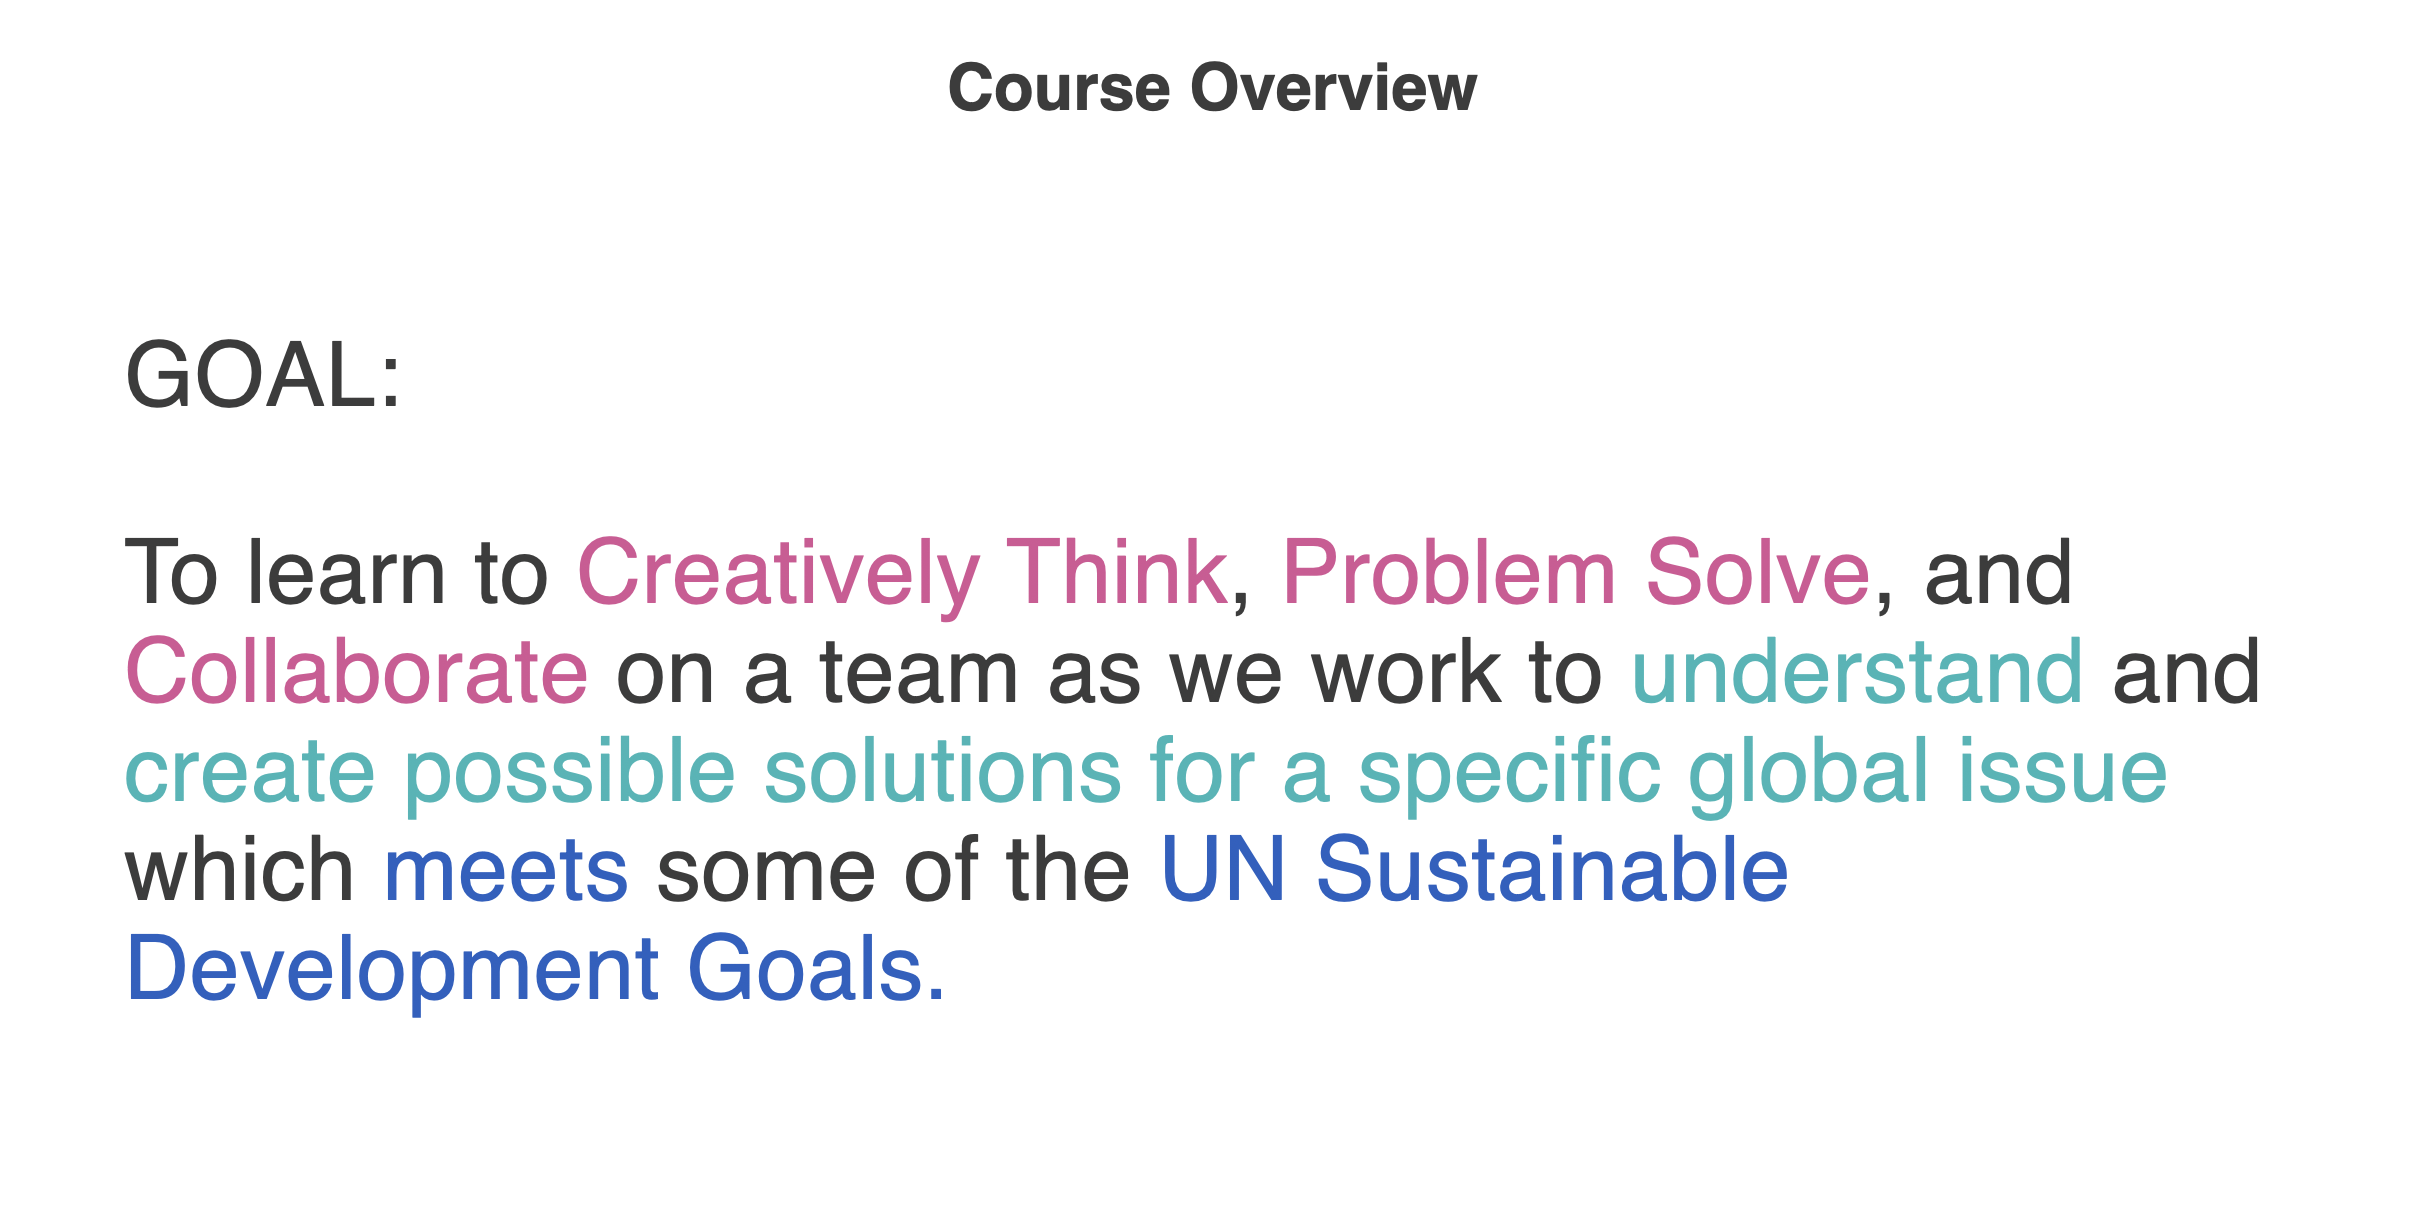
I color coded my goal for students. Pink was the “How”; Teal was the “Why”; Blue was the “What- Connection”
This course goal is very broad, but that was intentional. Living in Asia, students work really well when they have a lot of parameters provided and there is a specific ‘answer’ they must get to. As part of this course was to encourage creative thinking and problem solving, I wrote the goal broadly to ensure students knew I wasn’t seeking one specific answer or solution to the problem I was going to pose.
Also, I wanted students to see that using systems thinking, often solutions we create can have a ripple impact (positive or negative) and may end up meeting more than 1 goal- this is why I didn’t specify what SDG goal would be met.
Thinking about what I wanted as the end outcome (for students to create a home that was flood resistant, while ensuring that their specific community needs were met), I then structured the course to follow the stages of the Design Cycle. In implementation at the start of every class, we’d review the day’s objective and the relationship it had to the design cycle.
I had 6 sections of this course over 2 years; while I initially used Backwards Planning for developing this unit of study, I did a lot of Design Thinking/ iterations (especially in stages 3-5) along the way to continually improve the course design.
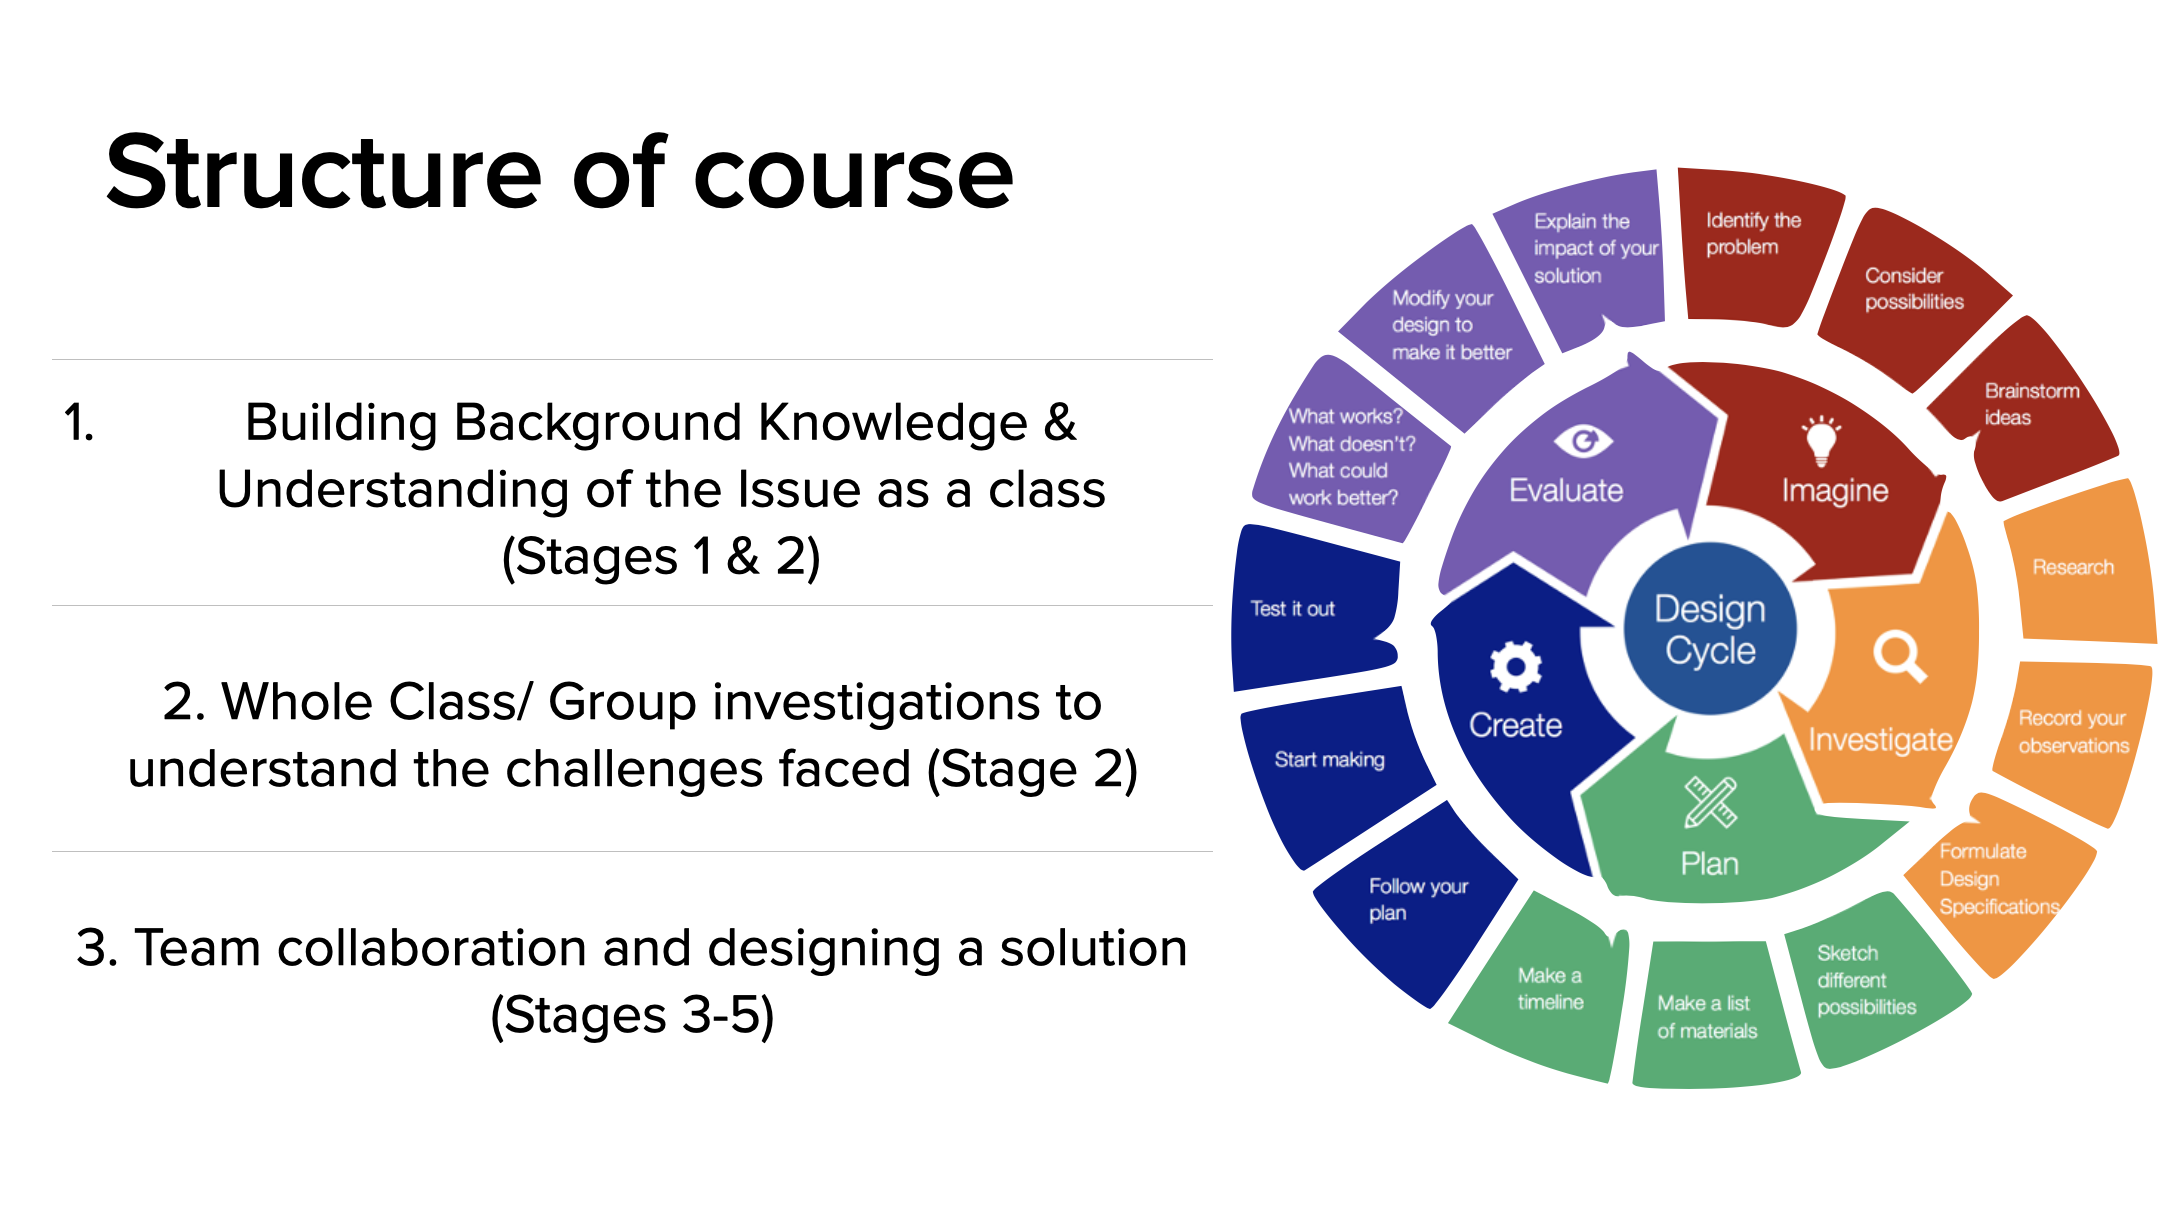
There are a lot of images for the design cycle; this is my favorite to teach design thinking with
Part B: Backwards Planning Step 3: What are the Big Ideas/ Skills Needed
This was a mixed Middle School grade level course (Grades 7/ 8- ages 12-14), but I had taught all the students at some point for at least 1 year. Students were already familiar with my style of teaching, my preference for conceptual learning focused on understanding principles and concepts, and that the design cycle is embedded in all of my classes. This was helpful because I was able to build on skills I knew they already had been taught.
For prior skills that were needed to be successful in this course, research and design skills were already taught in my core course and all of the students had taken that course. Additionally, students were already familiar with my expectations in regards to collaboration, time/ resource management so I didn’t need to spend much time teaching collaboration skills. As this division was a 1-1 laptop program, students were well versed in Google drive/ Google slides/ uploading & naming documents/images/ videos and other basic computer competencies. Therefore there weren’t a lot of core skills I needed to cover for students to be successful in this class.
The new skills that I needed to ensure that students were taught were related to math when it came to scaling for model creation and drawing a blueprint. I collaborated with the math department and they taught specific lessons in their classes when we got to Stage 4: Design. I also did a review lesson on how to scale and draw blueprints in class and provided a video that they could go back and watch if they got stuck.
Another skill I needed to teach was how to create a budget spreadsheet as they had a specific amount of “money” they could spend for this project. Also, using some of the Maker Space tools (ie electric saws, sanders, etc) would be new to some but those skills could taught as needed. The students were really good about nominating one person to learn the skill and then return to teach their teammates.
WHAT DIDN’T WORK:
The one section where it was decided a mixed G6-8 class should be offered (ages 10-14- as there were several young G6 students), was not successful. Most of the time was spent teaching the expected base skills as many did not have prior exposure to them. Early on it clear that the pacing, content, and course structure had to be modified to accommodate these needs. Additionally, the maturity levels were so vast that in the end, the class became an introduction to design thinking and the goal of the course had to be revised. As this was not the purpose of the course, it went promptly back to being only offered for upper Middle School students.
What was the take away?
Taking time to identify what prior skills/ background knowledge individuals should have is key to program design and success. If that isn’t taken into consideration, you may find you run into challenges (ie: pacing, content coverage, building new skill sets, resource management, etc) that could have been navigated around earlier.
Part C: Backwards Planning Step 4: Measuring/ Assessing Outcomes
This division was a 1-1 laptop program so the easiest way for me to continually assess the students’ process was digitally. I created a digital student portfolio that would allow me to see each team’s work flow. Photo evidence was uploaded onto their portfolio slides and students could also share their thought process as they moved through the design cycle. Additionally, when I wasn’t working in the design space with them, I could give feedback more quickly by reviewing what evidence they felt was most important to share.
Each day, I would post our goals and expectations so we were all clear on what outcomes we should be leaving class with.

Sample goal for the day
I also would provide a simple example of what I was seeking on days they were doing their independent investigations.
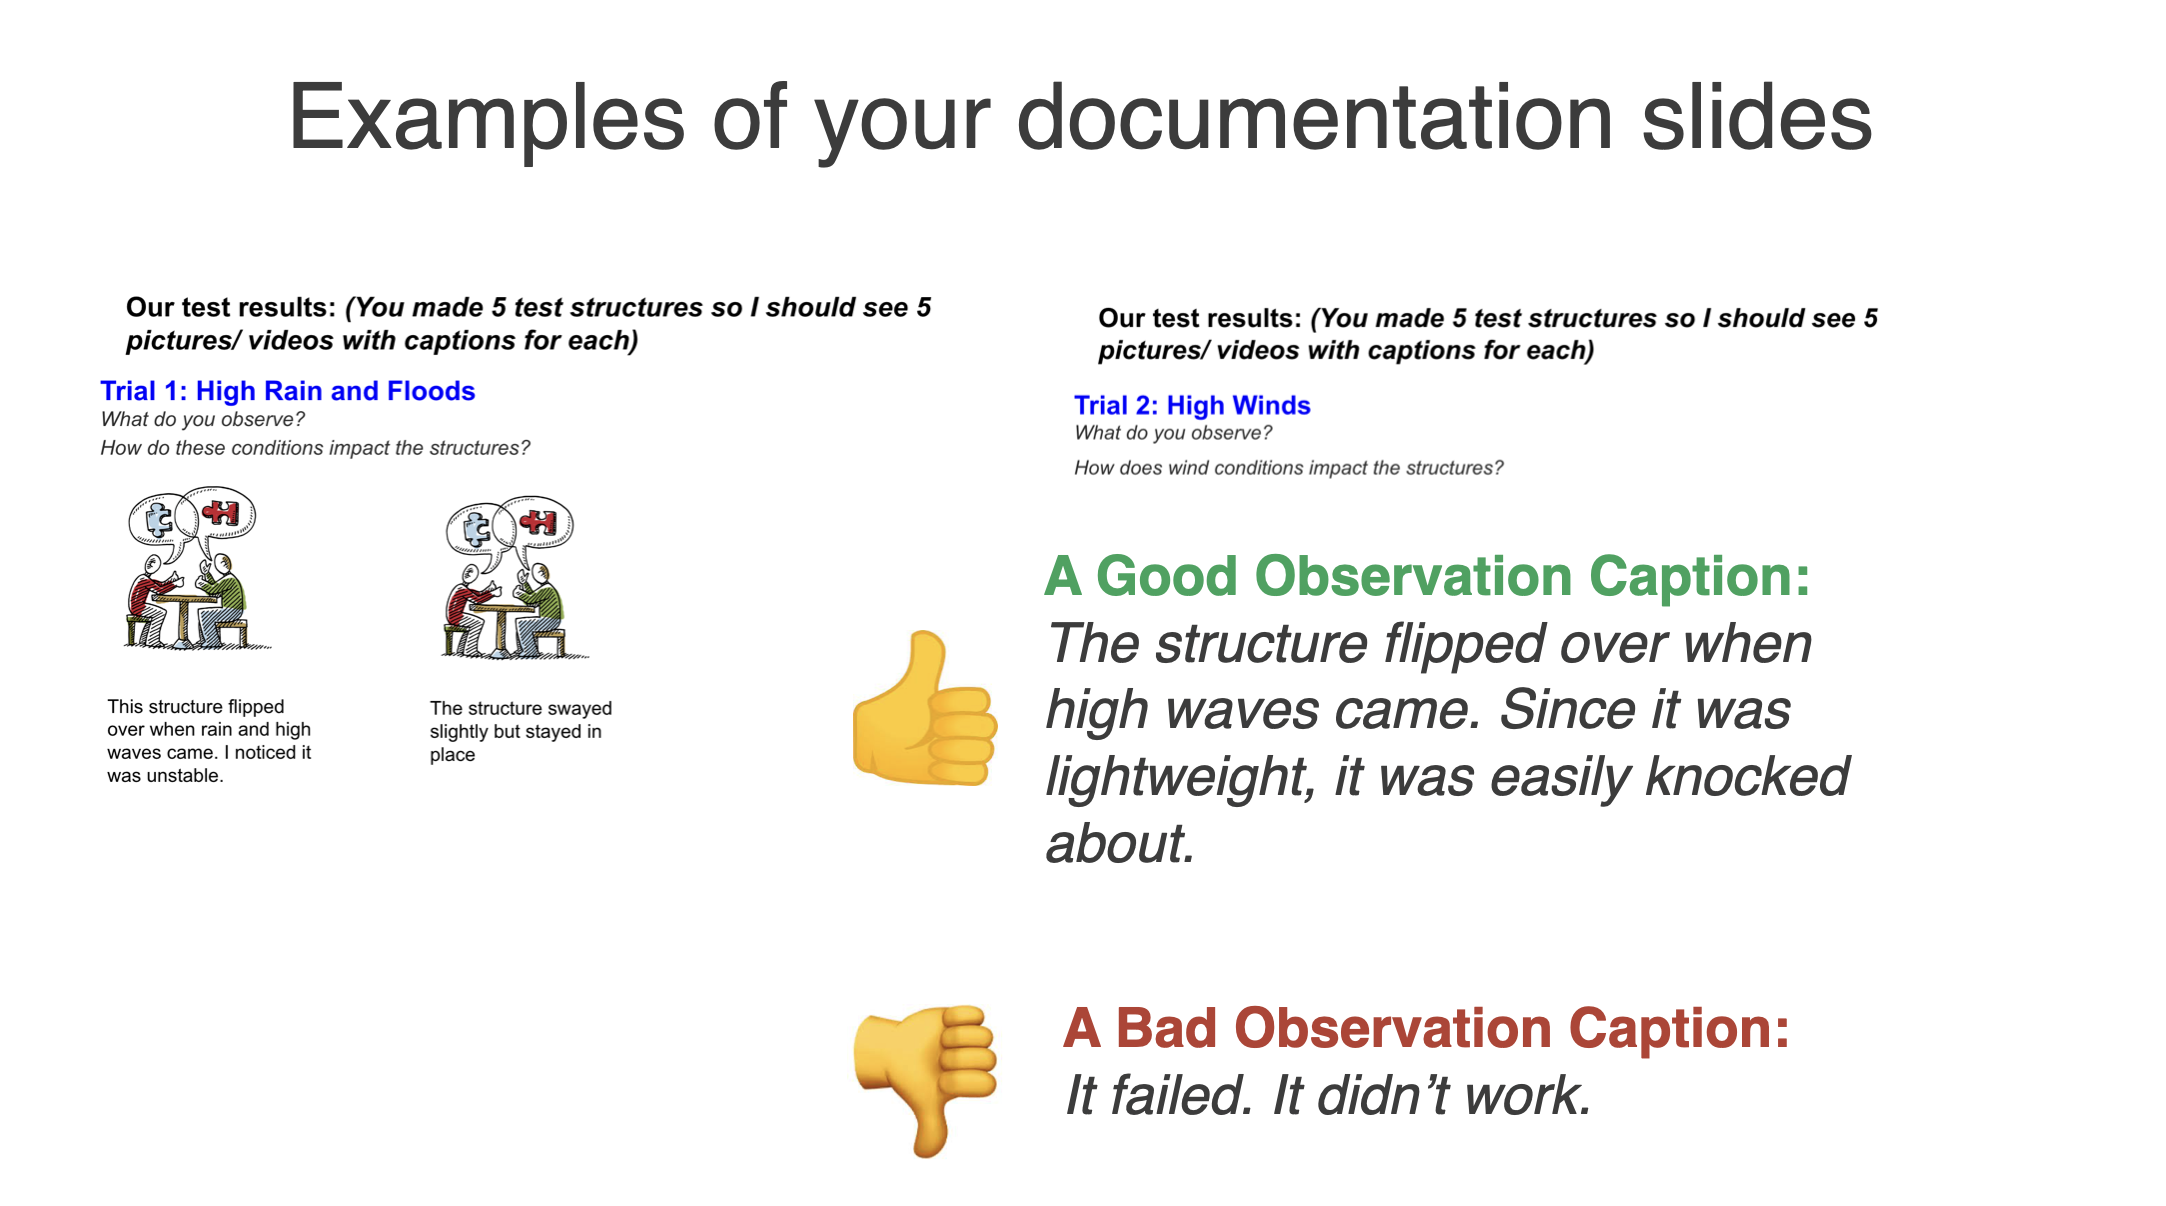
A sample portfolio slide explains how documentation should take place.
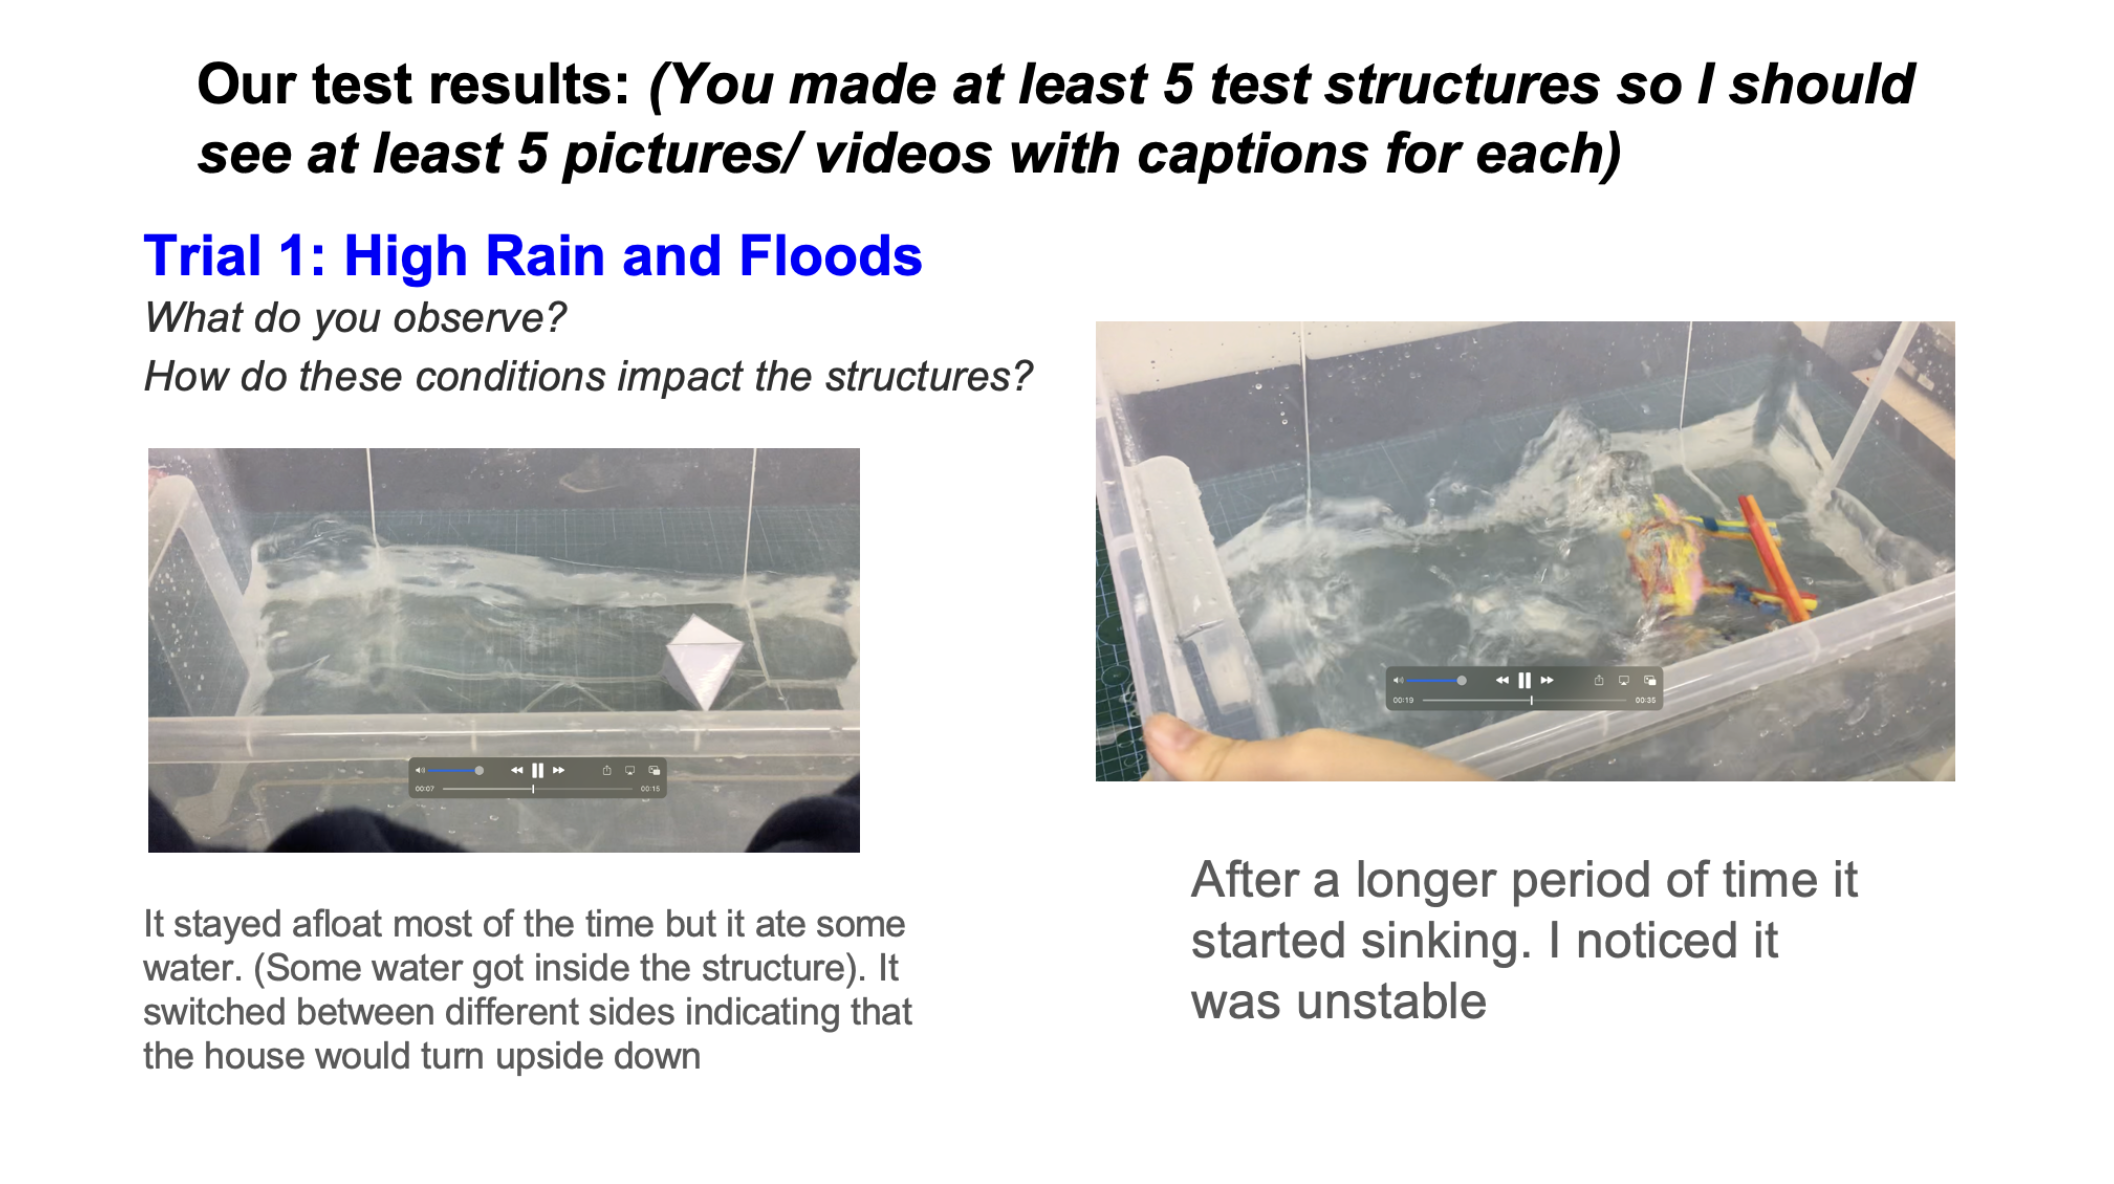
Sample student documentation as students were exploring frames vs shells.
Throughout, there was always time provided to stop and share what they were discovering.
In the example below, after completing 2 days of investigations regarding potential structural ideas and building materials, groups shared their findings out loud. As they shared, I scribed their ideas. This allowed them to learn from one another and also allowed me to check for understanding.


Part D: Assessing the Final Outcome- The Design Challenge
When students got to the actual Design Challenge they had a specific scenario they were given that they needed to create a solution for. Using the specific information from their team’s scenario cards, each team was responsible to create a home that was flood resistant, while ensuring that their specific community needs were met.
Each team would work through the design process again, this time independently as a team. In order to move through each stage, they did have checkpoints that I would sign off on. Teams were able to move as quickly or as methodically as desired through these stages (as long as they were finished with a stage by the given deadline) but they wouldn’t be allowed to advance until I had given the okay.
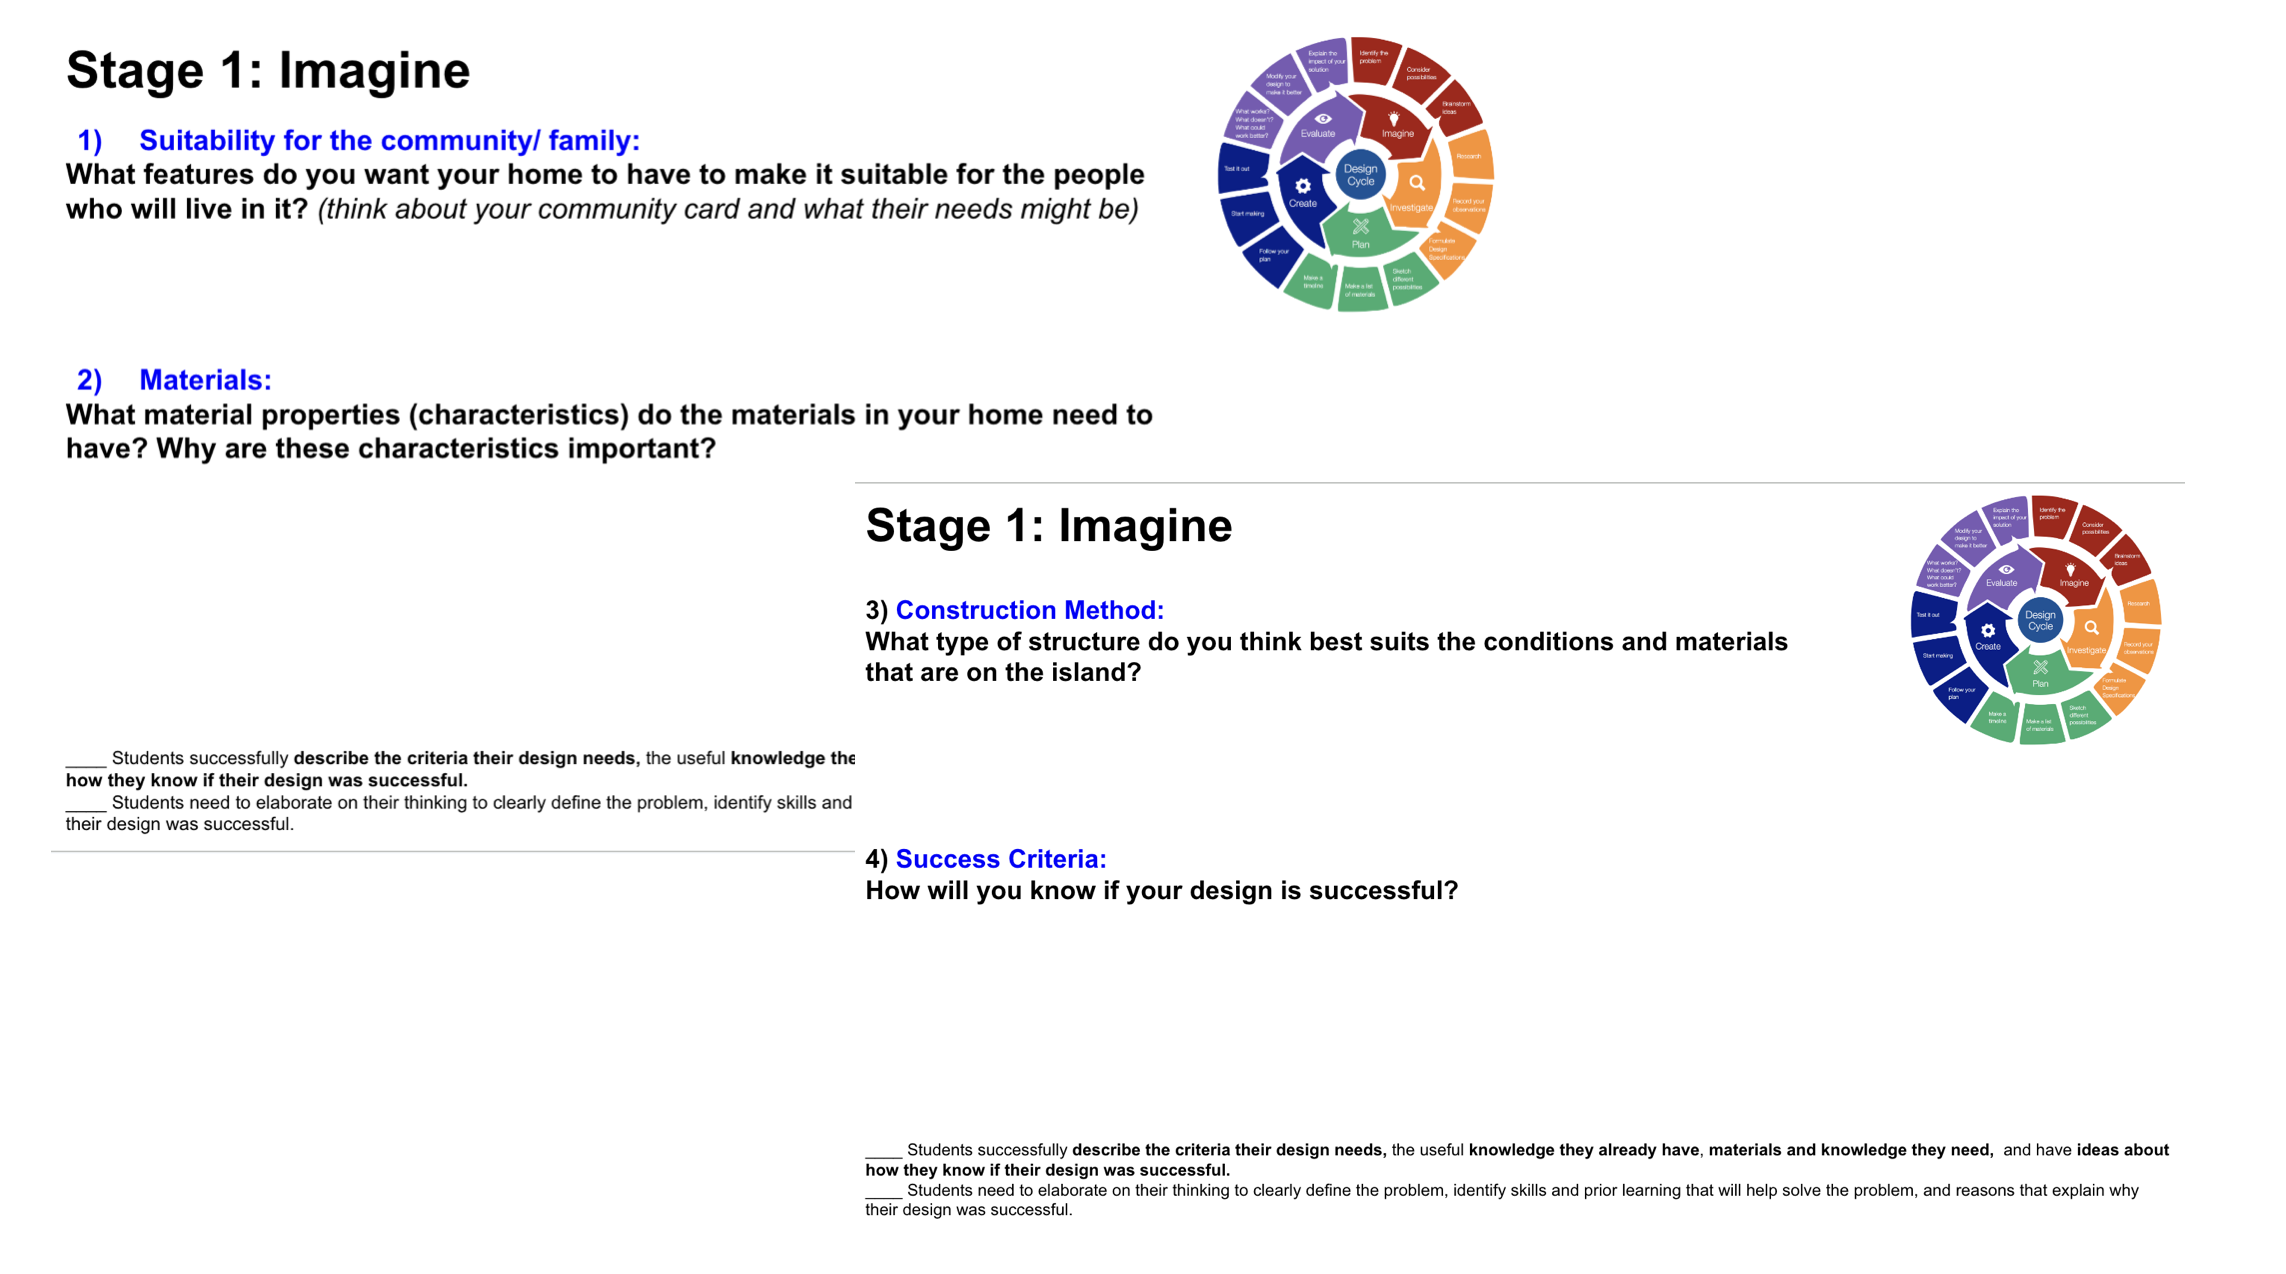
Sample slide guiding them through the design cycle. The criteria for knowing whether they could move forward is at the bottom. As it’s a google slide, I could leave comments along the way for areas that I saw may need further development.
Final Thoughts…
So this is an example of how Backwards Planning can be used to compliment Instructional Design. By being intentional and starting with the end goal in mind:
✅ It made it much easier to plan and structure the course
✅ It helped with assessment - I knew exactly what I was assessing, the criteria I would be using, and the checkpoints I wanted to create along the way
✅ It was easier to create a timeline so I knew how much time I should be spending on each section of the course
✅ It helped provide clarity regarding what learning activities I planned; I had a lens as I was able to evaluate with- were these activities moving us towards the primary goal or was I spending too much time on things that weren’t as important?
✅ I was able to consider what challenges I might run into and I could anticipate how to solve them in advance
✅ As this was a design class, we had a lot of materials and needed space to store projects; knowing in advance what I needed made it much easier to order supplies and to think through a material management system
In our next blog post, we will explore the intentionality behind the decision-making processes, examining how beginning with the "WHY" not only informs our choices but, when paired with deliberate and thoughtful questioning from the start, leads to successful outcomes.
If you’re new to Backwards Planning or would like a thought partner as you plan out your next idea, reach out and connect with me~ I’d love to be a part of your process!